Download and copy the "RadialTools CC 2020.atn" file below to the directory where you currently store your Photoshop actions. This will be something like: "{installation folder}\Adobe\Adobe Photoshop CC 2020\Presets\Actions" Alternatively, the ZIP file contains the same file with a "ReadMe.txt" with installation and help information.
RadialTools CC 2020.atn RadialTools CC 2020.zip
- Open Photoshop and go to the "Actions" palette.
- If it the "Actions" palette is not visible, got to the "Window" menu item, then click "Actions" in the dropdown.
- Click on the menu icon, click the small options icon in the upper right of the "Actions" palettte.
- From the dropdown menu, click on "Load Actions..." and find where you saved the "RadialTools CC 2020.atn" file where you saved it in the file system and select the file ending in ".atn".
- Click "Open" and your actions will load into the actions palette.
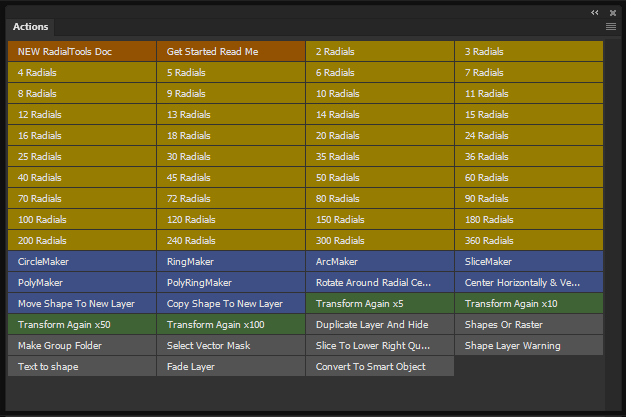
- If your actions are in Actions "Button Mode" should see the multi-colored actions in the attached image.
- If your actions are displayed as a list, check the actions option menu "Button Mode" to display the actions as a button.
Create NEW RadialTools Doc
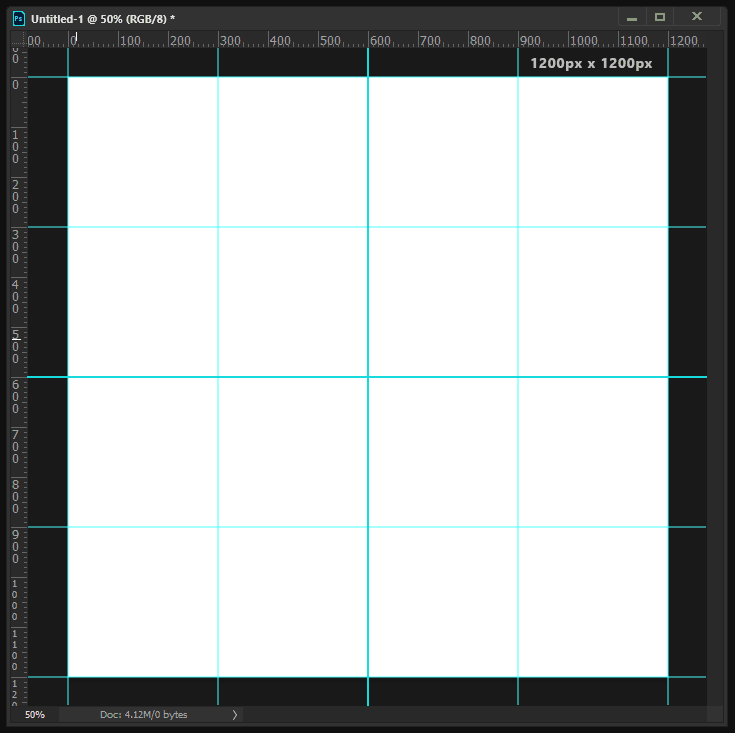
- Click the "New RadialTools Doc" action to create a new Radial Tools document.
- Creates a 1200 x 1200 canvas with symetrical guidelines at 300px, 600px, 900px both vertically and horizontally.
- All radial transforms rotate around the central horizontal 600px / vertical 600px midpoint of the document.
Create a new shape layer
- Create a shape with one of the pen or polygon tools
- Alternately, use one of the ---Maker actions below that create a shape directly in the center of your document.
The Radial actions
- Select the shape you want to radially distrubute using Path Selection Tool and click the action (like "100 Radials") for the total number of items you want. All shapes will be created on the same shape layer. If the Actions window is not in "Button Mode", select the appropriate text version of the action, then click the triangular "Play Selection" button at the bottom of the Actions window to play.
- If the Move tool is active when a Radial action (such as "10 Radials") is invoked, 10 new layers will be created. To put the shapes back on one layer, select the shapes you just created in the Layers menu, Right click on the layers and select "Merge Shapes".
-
Radial actions work on bitmap layers! When the layer the Radial action is a bitmap, a different sequence is followed than when the
layer is a shape layer. First, new folder layer called "Radials" is created. Then the layer is converted to a Smart Object so that subsequence transforms
will not degrade from the source bitmap fidelity when rotated. The appropriate number of copies of the layer are then created radially around the document center point
and saved into the folder.
As the copies are all linked to the original layer, editing the source document will update all the rotated copies. To edit the source, double-click the layer icon on one of the source document will open. Edit this document and Save it and you will see your change applied to all the copies.
The Maker actions
-
CircleMaker
Creates a circle in the exact center of the Radial Tools doc then puts it in Free transform mode so that you can size if to whatever size you need it. Hold down the Alt (Option on MAC) button to scale from the center. -
RingMaker
Creates a circle with CircleMaker, then immediately creates another, smaller circle that is subtracted out to create a ring. Use the Free transform steps to scale the inner and outer edges as needed, holding down the Alt (Option on MAC) button to scale from the center when needed. -
ArcMaker
Creates a ring with RingMaker, then crops the ring to the bottom right quadrant of the canvas so that you are left with an arc centered on the Radial Tools doc midpoint. Now click outside the box to get a Rotation handle and drag it to the right or left to rotate around the midpoint. Hold the Shift button to maintain 15 degree increments or directly enter numbers in the Transform bar angle field. Whatever shape is left in the bottom right quadrant is the final arc. -
SliceMaker
Creates a circle slice similar to a pie. Works just like the ArcMaker except the result is a slice instead of an arc. -
PolyMaker (Photoshop 2021+)
Creates an n-sided polygon in the exact center of the Radial Tools doc then puts it in Free transform mode so that you can size if to whatever size you need it. Hold down the Alt (Option on MAC) button to scale from the center.
In Photoshop 2021+, the properties of polygon, including number of sides, radius of rounded corners, and star indent, are all still fully editable in the Properties/Appearance window. The polygon must be selected with the Path Selection tool or be the only shape on the layer if using the Move tool to see this info. -
PolyRingMaker (Photoshop 2021+)
Creates n-sided polygon with PolyMaker, then immediately creates another, smaller polygon that is subtracted out to create a ring. Use the Free transform steps to scale the inner and outer edges as needed, holding down the Alt (Option on MAC) button to scale from the center when needed.
In Photoshop 2021+, the properties of the two polygons remain editable in the Properties/Appearance window. If the Move tool is selected. If the Path Selection tool is used, make sure both polygons are selected for changes to be made to both.
The Utility actions
-
Rotate Around Radial Center
This is a quick way to rotate a layer around the document center point. -
Center Horizontally & Vertically
Applies the Align shape to both the horizontal and vertical axis. -
Move Shape To New Layer
Any shapes selected by the Path Selection will be copied to a new layer and colored with the current Foreground Color. -
Copy Shape To New Layer
Duplicate any shapes selected by the Path Selection to a new layer and colors them with the current Foreground Color. -
Transform Again (x5, x10, x50, x100)
After any transform (scale, rotate, move) has been done, Photoshop allows you to repeat the same transform again using the Transform Again command on the Edit menu. These actions are just shortcuts for repeating this command x multiple times with the "with copy" modifier to make multiple instances with that transform applied. Radial Tools utilizes this approach for the Radials actions, but they can also be useful as stand alone actions.
For instance, create a fence post. Move it using the Edit/Transform menu command. You can apply exact pixel/percent values in the options bar if needed. Click the Transform Again x100 action and you now have 100 fence posts using the values you just entered.
The Other actions
-
Duplicate Layer And Hide
Duplicates the current layer and hides it, then returns to the original layer. This can be useful when you want to hide a duplicate for later use. -
Slice To Lower Right Quadrant
The ArcMaker and the SliceMaker actions use this action to trim a specific angle for the arc or slice you are creating to anything that is in the lower right quadrant. TIP: 'Duplicate Layer And Hide' is one of the unchecked steps in this action. Check it so that the circle or ring that the arc or slice is taken from will be duplicated and saved as a hidden layer. -
Text To Shape
This is a quick shortcut that converts text to a shape layer. - The other actions: Shapes Or Raster, Make Group Folder, Select Vector Mask, Slice To Lower Right, Shape Layer Warning, and Fade Layer are mainly used as steps internally for other RadialTools actions.
Yes, these actions require the latest version of Photoshop. The more recent versions will likely have the fewest issues but you are welcome to try running them on older versions of Photoshop.
Unfortunately, most of the Radial Tools actions are designed to be used in this specific document size. This is not always as much of a liability as you might think. The Radial Document can be fully embedded in another document and it retains full editability and as the shapes are resolution-independent, the document can be scaled up without image degredation. If there is enough interest, I will write a How-To on how you can do this.
The Photoshop Symetry Tool is designed for Painting / Drawing bitmap images, while Radial Tools is predominently focused on creating precision vector shapes. I do expect some synergy between the two different approaches to Radial design and look forward to seeing how that will work.
Radial Tools is currently licensed for both commercial and non-commercial to the user free of charge. Radial Tools may not be distributed in a collection without consent. I reserve the right to limit distribution and may make commercial use dependent on a paid license at some pont in the future.